配置本地MCP服务器及调用RapidAPI代码执行服务

配置本地MCP服务器及调用RapidAPI代码执行服务

所谓诚其意者 毋自欺也

配置本地MCP服务器及调用RapidAPI代码执行服务

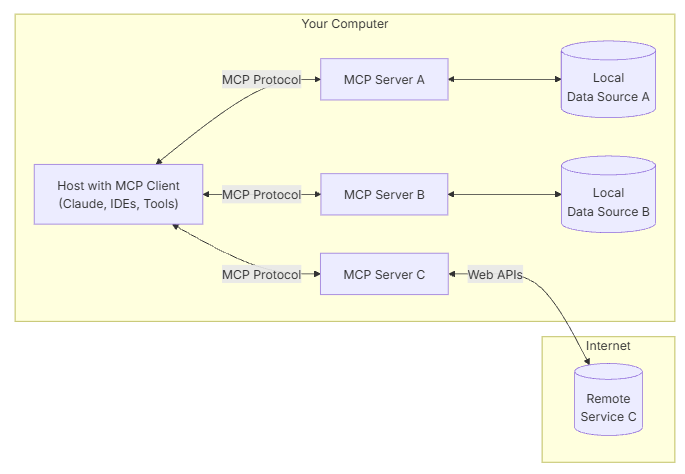
在现代AI应用中,我们常常希望模型能够调用外部工具或服务来完成特定任务,例如执行代码、查询数据库或调用第三方API。模型上下文协议(Model Context Protocol, MCP)提供了一种标准化的方式来实现这种交互。

本教程将指导您如何一步步在本地Windows环境中配置一个基于Node.js的MCP服务器,该服务器能够连接到RapidAPI上的代码执行服务(具体为 Judge0 CE API)。同时,我们还将介绍如何在(假设的)客户端应用 Cherry Studio 中配置此服务器,从而让AI能够通过函数调用(Function Call)来执行代码片段。

第一部分:搭建本地 MCP 服务器

1. 创建项目目录并初始化

首先,我们需要在您的 Windows 电脑上创建一个项目文件夹,并初始化 Node.js 项目。

命令 (PowerShell):

1
2
3
4
5
6
7
8
# 切换到 H 盘(如果需要)
H:
# 创建项目目录(如果目录已存在,此命令会提示,可以忽略)
mkdir mcp-rapidapi-server
# 进入项目目录
cd mcp-rapidapi-server
# 初始化 npm 项目,生成默认 package.json
npm init -y

说明:

  • mkdir: 创建新目录。
  • cd: 切换当前目录。
  • npm init -y: 快速生成一个 package.json 文件,用于管理项目依赖和脚本。

2. 安装依赖

接下来,我们需要安装运行 MCP 服务器所必需的依赖库。

命令 (PowerShell):

1
npm install @modelcontextprotocol/sdk zod node-fetch

说明:

  • @modelcontextprotocol/sdk: MCP 协议的官方 Node.js SDK,用于创建 MCP 服务器。
  • zod: 一个强大的 TypeScript/JavaScript 模式验证库,用于验证工具的输入参数。
  • node-fetch: 允许在 Node.js 环境中像浏览器一样使用 Workspace API 来发送 HTTP 请求。我们用它来调用 RapidAPI。

3. 配置 package.json

为了确保能使用 ES 模块语法(如 import/export)并方便地启动服务器,我们需要对 package.json 文件进行一些修改。

编辑 H:\mcp-rapidapi-server\package.json 文件,内容如下:

1
2
3
4
5
6
7
8
9
10
11
12
13
14
15
16
{
"name": "mcp-rapidapi-server",
"version": "1.0.0",
"main": "server.js",
"type": "module", // 启用 ES 模块
"scripts": {
"start": "node server.js", // 定义启动脚本
"test": "echo \"Error: no test specified\" && exit 1"
},
"dependencies": {
// 依赖库及其版本(实际安装版本可能因 ^ 而略有不同)
"@modelcontextprotocol/sdk": "^1.0.0",
"node-fetch": "^3.0.0",
"zod": "^3.0.0"
}
}

说明:

  • "type": "module": 这是启用 ES 模块的关键设置。
  • "start": "node server.js": 允许我们稍后通过 npm start 命令来启动服务器。

4. 创建并编写 server.js

现在,核心的服务器逻辑来了。在 H:\mcp-rapidapi-server 目录下创建一个名为 server.js 的文件,并将以下代码粘贴进去。

代码 (server.js):

1
2
3
4
5
6
7
8
9
10
11
12
13
14
15
16
17
18
19
20
21
22
23
24
25
26
27
28
29
30
31
32
33
34
35
36
37
38
39
40
41
42
43
44
45
46
47
48
49
50
51
52
53
54
55
56
57
58
59
60
61
62
63
64
65
66
67
68
69
70
71
72
73
74
75
76
77
78
79
80
81
82
83
84
85
86
87
88
89
90
91
92
93
94
95
96
97
98
99
100
101
102
103
104
105
106
107
108
109
110
111
112
113
114
115
116
117
118
119
120
121
122
123
124
125
126
127
128
129
130
131
132
133
134
135
136
137
138
139
140
141
142
143
144
145
146
147
148
149
150
151
152
153
154
155
156
157
158
159
160
161
162
163
164
165
166
167
168
169
170
171
172
173
174
175
176
177
178
179
180
181
182
183
184
185
186
187
188
189
190
191
192
193
194
195
196
197
198
199
200
201
import { McpServer } from "@modelcontextprotocol/sdk/server/mcp.js";
import { StdioServerTransport } from "@modelcontextprotocol/sdk/server/stdio.js";
import { z } from "zod";
import fetch from "node-fetch";

// --- 辅助函数和常量 ---

// 支持的语言及其在 Judge0 API 中的 ID
const LANGUAGE_IDS = {
"c": 50,
"cpp": 54,
"go": 95,
"java": 91,
"javascript": 93,
"python": 92,
"ruby": 72
};

// 语言别名,增加容错性
const LANGUAGE_ALIASES = {
"c++": "cpp",
"golang": "go",
"js": "javascript"
};

// 根据语言名称获取对应的 ID
function getLanguageId(language) {
let l = language.toLowerCase();
return LANGUAGE_IDS[LANGUAGE_ALIASES[l] || l] || 0; // 不支持则返回 0
}

// Base64 编码函数 (用于 Judge0 API)
function encode(str) {
return Buffer.from(unescape(encodeURIComponent(str || ""))).toString('base64');
}

// Base64 解码函数 (用于 Judge0 API 返回结果)
function decode(bytes) {
const escaped = escape(Buffer.from(bytes || "", 'base64').toString());
try {
return decodeURIComponent(escaped);
} catch {
return unescape(escaped); // Fallback for potential decoding errors
}
}

// --- MCP 服务器设置 ---

// 创建 MCP 服务器实例
const server = new McpServer({
name: "rapidapi-code-execution",
version: "1.0.0",
});

// --- 工具定义与注册 ---

// 定义代码执行工具的处理函数
const codeExecutionHandler = async ({ source_code, language }) => {
// 从环境变量获取 RapidAPI 密钥
const rapidApiKey = process.env.RAPIDAPI_KEY;
if (!rapidApiKey) {
return { content: [{ type: "text", text: "Error: RAPIDAPI_KEY environment variable not set." }] };
}

const languageId = getLanguageId(language);
if (languageId === 0) {
// 如果语言不受支持,返回错误信息
return {
content: [
{
type: "text",
text: `Unsupported language: ${language}`,
},
],
};
}

// 准备请求 RapidAPI 的 Headers 和 Body
const requestHeaders = {
"x-rapidapi-key": rapidApiKey,
"x-rapidapi-host": "judge0-ce.p.rapidapi.com", // 明确 Host
"Content-Type": "application/json",
};
const requestData = {
language_id: languageId,
source_code: encode(source_code), // 源代码需要 Base64 编码
redirect_stderr_to_stdout: true, // 将标准错误重定向到标准输出
};

try {
// 发送 POST 请求到 Judge0 API
const response = await fetch(
"[https://judge0-ce.p.rapidapi.com/submissions?base64_encoded=true&wait=true](https://judge0-ce.p.rapidapi.com/submissions?base64_encoded=true&wait=true)", // 使用 base64 并等待执行结果
{
method: "POST",
headers: requestHeaders,
body: JSON.stringify(requestData),
}
);

// 处理网络或 API 错误
if (!response.ok) {
const errorText = await response.text();
console.error("RapidAPI Error:", response.status, errorText);
return {
content: [
{
type: "text",
text: `API request failed with status ${response.status}: ${errorText}`,
},
],
};
}

// 解析返回的 JSON 数据
const responseData = await response.json();

// 组合编译输出和标准输出作为最终结果
const compileOutput = decode(responseData["compile_output"]);
const stdoutOutput = decode(responseData["stdout"]);
const stderrOutput = decode(responseData["stderr"]); // 也解码 stderr 看看
const message = responseData["message"] ? decode(responseData["message"]) : ""; // 解码 message
const statusDesc = responseData.status?.description || ""; // 获取状态描述

let resultText = "";
if (compileOutput) resultText += `Compile Output:\n${compileOutput}\n`;
if (stdoutOutput) resultText += `Output:\n${stdoutOutput}\n`;
if (stderrOutput) resultText += `Error Output:\n${stderrOutput}\n`;
if (message) resultText += `Message:\n${message}\n`;
if (statusDesc) resultText += `Status: ${statusDesc}\n`;


return {
content: [
{
type: "text",
text: resultText.trim() || "Execution finished with no output.", // 如果完全没输出,给个提示
},
],
};
} catch (error) {
// 捕获请求过程中的异常
console.error("Fetch Error:", error);
return {
content: [
{
type: "text",
text: `Error during API call: ${error.message}`,
},
],
};
}
};

// 向 MCP 服务器注册 'code_execution' 工具
server.tool(
"code_execution", // 工具名称,AI 调用时使用
"Run code in various programming languages using RapidAPI Judge0", // 工具描述
{
// 定义输入参数及其类型和描述 (使用 Zod)
source_code: z.string().describe("The source code snippet to execute."),
language: z
.enum(["c", "cpp", "go", "java", "javascript", "python", "ruby"]) // 支持的语言列表
.describe("The programming language of the source code."),
},
codeExecutionHandler // 指定处理函数
);

// --- 测试代码 (已注释掉,仅用于开发调试) ---
/*
if (process.env.TEST_MODE) {
const testInput = {
source_code: "print('Hello from MCP test!')",
language: "python"
};
console.log("Running in TEST_MODE...");
codeExecutionHandler(testInput).then(result => {
console.log("Test result:", JSON.stringify(result, null, 2));
process.exit(0); // 测试成功后退出
}).catch(error => {
console.error("Test error:", error);
process.exit(1); // 测试失败后退出
});
}
*/

// --- 服务器主运行逻辑 ---
async function main() {
// 如果不是在测试模式下,则正常启动服务器
if (!process.env.TEST_MODE) {
const transport = new StdioServerTransport(); // 使用标准输入输出进行通信
await server.connect(transport);
console.error("RapidAPI Code Execution MCP Server running on stdio..."); // 使用 console.error 避免干扰 stdout
}
}

// 启动服务器并捕获潜在错误
main().catch((error) => {
console.error("Fatal error initializing server:", error);
process.exit(1);
});

说明:

  • 模块导入: 代码首先导入了所需的 SDK 组件、zodnode-fetch
  • 辅助函数: 包含处理语言 ID、别名以及 Base64 编解码的函数。
  • 服务器实例化: 创建了一个 McpServer 实例。
  • 工具处理函数 (codeExecutionHandler): 这是核心逻辑所在,负责接收参数、调用 RapidAPI、处理响应和错误,并返回符合 MCP 格式的结果。注意: 已添加对 RAPIDAPI_KEY 环境变量是否设置的检查。同时改进了错误处理和结果组合。
  • 工具注册 (server.tool): 将 codeExecutionHandler 函数注册为名为 code_execution 的工具,并定义了输入参数的模式(使用 zod)。
  • 测试代码: 这部分代码(现在已被注释掉)用于在开发时快速测试 codeExecutionHandler 函数是否能正常工作。
  • 主函数 (main): 使用 StdioServerTransport 启动服务器,监听标准输入输出流,等待客户端(如 Cherry Studio)连接。

5. 测试服务器 (可选,但推荐首次运行时执行)

在您确认代码无误后,可以通过设置环境变量并运行脚本来测试服务器是否能独立调用 RapidAPI。

命令 (PowerShell):

1
2
3
4
5
6
7
8
9
10
11
12
13
14
15
# 确保在项目目录下: H:\mcp-rapidapi-server
cd H:\mcp-rapidapi-server

# 设置 RapidAPI 密钥 (请替换为你的真实密钥)
$env:RAPIDAPI_KEY="YOUR_RAPIDAPI_KEY_HERE"

# 设置测试模式环境变量
$env:TEST_MODE="1"

# 运行服务器脚本 (在测试模式下)
node server.js

# 清理环境变量 (可选)
# Remove-Item Env:\RAPIDAPI_KEY
# Remove-Item Env:\TEST_MODE

预期输出 (类似这样):

1
2
3
4
5
6
7
8
9
Running in TEST_MODE...
Test result: {
"content": [
{
"type": "text",
"text": "Output:\nHello from MCP test!"
}
]
}

说明:

  • 环境变量: 在运行前必须设置 RAPIDAPI_KEYTEST_MODE=1
  • 成功标志: 看到类似 “Test result: …” 的输出并且程序正常退出,表示 server.js 中的 codeExecutionHandler 函数可以成功调用 RapidAPI。
  • 失败排查: 如果出错,请检查:
    • RAPIDAPI_KEY 是否正确且有效。
    • 网络连接是否正常。
    • 依赖是否都已正确安装 (npm install)。
    • server.js 代码是否有语法错误。

6. 准备正式运行

测试成功后,服务器脚本就已经准备好了。您可以移除或保持注释掉 server.js 中的测试代码块。确保在后续步骤中不设置 TEST_MODE 环境变量,以便服务器能正常启动并等待客户端连接。


第二部分:在 Cherry Studio 中配置 MCP 服务器

服务器端已经就绪,现在我们需要告诉 Cherry Studio 如何找到并运行这个服务器。以下是在 Cherry Studio 图形界面中进行配置的步骤(基于通用配置项推断)。

配置步骤

1. 打开MCP服务器配置窗口

  • 启动 Cherry Studio 应用程序。
  • 在菜单栏或设置界面中找到与 MCP 服务器外部工具 或类似功能相关的配置选项。
  • 点击 “添加服务器”“新建配置” 或类似按钮,打开用于添加新 MCP 服务器的配置窗口。

2. 填写配置字段

在弹出的配置窗口中,仔细填写以下信息:

  • **名称 (Name)**:
    • 值: @modelcontextprotocol/server-rapidapi-code-execution
    • 说明: 给这个服务器配置起一个唯一的、易于识别的名称。
  • **描述 (Description)**:
    • 值: MCP server for executing code via RapidAPI Judge0 API
    • 说明: 简要描述这个服务器的功能。
  • **类型 (Type)**:
    • 选项: STDIO (或 Standard Input/Output)
    • 说明: 选择此类型,因为我们的服务器是通过标准输入/输出来与 Cherry Studio 通信的。
  • **命令 (Command)**:
    • 值: node
    • 说明: 指定用于启动服务器进程的可执行文件。这里是 Node.js 运行时。
  • **参数 (Arguments)**:
    • 值: H:\mcp-rapidapi-server\server.js
    • 说明: 提供 server.js 脚本的 完整绝对路径请务必根据您的实际文件位置修改此路径。 确保路径分隔符对于 Windows 是反斜杠 \
  • **环境变量 (Environment Variables)**:
    • 值: RAPIDAPI_KEY=YOUR_RAPIDAPI_KEY_HERE
    • 说明: 在这里设置服务器运行时所需的环境变量。YOUR_RAPIDAPI_KEY_HERE 替换为您自己的有效 RapidAPI 密钥。 如果有多个环境变量,通常可以换行或按特定格式添加。
  • **启用 (Usage / Enable)**:
    • 状态: 开 (On) / 启用 (Enabled)
    • 说明: 确保此开关处于打开状态,以激活这个服务器配置。

3. 保存配置

  • 填写完所有字段后,点击窗口中的 “确定”“保存”“应用” 按钮。

4. 重启 Cherry Studio (推荐)

  • 为了确保新的 MCP 服务器配置被完全加载和识别,建议关闭并重新启动 Cherry Studio 应用程序。

5. 测试配置

  • 重启后,尝试在 Cherry Studio 中向 AI 发出需要执行代码的指令。例如:

    “请使用 python 运行代码: print(1 + 2 * 3)

  • 观察 AI 的响应。如果配置成功,AI 应该能够识别出这是一个需要使用 code_execution 工具的任务,然后调用您本地运行的 MCP 服务器。服务器执行代码(通过 RapidAPI)后,将结果返回给 AI,最终显示给您。

  • 预期结果 (示例):

    1
    2
    Output:
    7

配置注意事项

  • 路径精确性: 参数 (Arguments) 中填写的 server.js 路径必须是 绝对路径 且完全正确,Cherry Studio 必须有权限访问该路径。
  • API 密钥: 环境变量 中的 RAPIDAPI_KEY 必须是您自己有效且未过期的 RapidAPI 密钥。
  • 服务器运行: Cherry Studio 在需要调用工具时,会根据您的配置尝试启动 node H:\mcp-rapidapi-server\server.js 命令。确保 Node.js 已正确安装并可在系统路径中找到。
  • 防火墙/安全软件: 某些情况下,防火墙或安全软件可能会阻止 Cherry Studio 启动本地进程或进行网络通信,需要相应配置允许。

故障排除

如果在测试配置时遇到问题(例如 AI 无法调用工具,或调用后报错),可以尝试以下步骤排查:

  1. 检查 Cherry Studio 日志: 查找与 MCP 服务器启动或通信相关的错误信息。

  2. 手动运行命令: 在 PowerShell 或 CMD 中,手动执行 Cherry Studio 配置中的完整命令(包括环境变量设置),例如:

    1
    2
    $env:RAPIDAPI_KEY="YOUR_RAPIDAPI_KEY_HERE"
    node H:\mcp-rapidapi-server\server.js

    观察是否有错误输出,或者服务器是否能正常启动并打印 ...running on stdio... 信息。

  3. 检查路径和密钥: 再次确认 server.js 的路径和 RapidAPI 密钥是否无误。

  4. 确认工具名称: 确保 AI 模型知道要调用的工具名称是 code_execution(与 server.jsserver.tool() 的第一个参数一致)。


总结

恭喜!通过以上步骤,您已经成功:

  1. 在本地搭建了一个 Node.js MCP 服务器,它能够代理对 RapidAPI 代码执行服务的调用。
  2. 在 Cherry Studio 中配置了这个本地服务器,使得 AI 可以通过 MCP 协议调用该服务器来执行代码。

这为您提供了一个强大的基础,您可以基于此扩展更多自定义工具,进一步增强您的 AI 应用能力。

  • Title: 配置本地MCP服务器及调用RapidAPI代码执行服务
  • Author:
  • Created at : 2025-04-29 20:06:12
  • Updated at : 2025-04-29 20:09:03
  • Link: https://xblog.aptzone.cc/2025/04/29/配置本地MCP服务器及调用RapidAPI代码执行服务/
  • License: All Rights Reserved © 凡
Comments